Gel nail polish requires careful handling to remove without damaging natural nails. This guide walks American readers through a practical, safe, and effective process using commonly available tools. Clear steps, safety notes, and common pitfalls are covered to help achieve a clean manicure-ready surface.
Readers will find a concise quick answer, a complete list of tools, step-by-step instructions, troubleshooting, and a buying guide to choose the right kit for home use or salon-style results.
Quick Answer
Key takeaway: Use 100% acetone with foil wraps or gel nail polish remover clips to soften gel, then lift with careful scraping. Follow with a nail buffer and moisturizer to restore nail health.
What You’ll Need
- 100% acetone gel nail polish remover with foil wraps
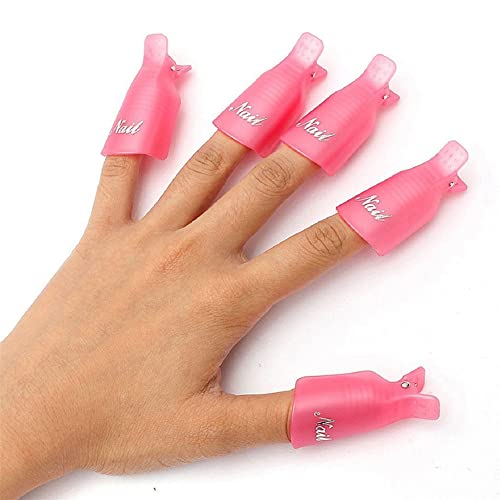
- gel nail polish remover clips for acetone wraps
- foil wrap kit for removing gel nail polish
- electric nail drill file for gel polish removal
- nail buffer block and cleaning brush for gel polish prep


Before You Start
Before beginning, ensure you have a clean, well-lit workspace and good ventilation. Protect surrounding skin with barrier cream and never apply acetone to damaged or irritated skin. Time estimates vary by polish thickness but plan for 25–40 minutes per hand. Avoid over-soaking to minimize nail dehydration and brittleness.
Step-By-Step: How To Clean Gel Nail Polish
- Remove any surface oils with a quick wipe using isopropyl alcohol or a dedicated prep pad.
- File the top layer of the gel to break the gloss and create a rough surface for better acetone penetration.
- Apply a generous amount of 100% acetone remover to each foil wrap or place a pad inside remover clips.
- Wrap the fingertips with foil wraps or secure in mounts until the gel begins to lift. Set a timer for 10–15 minutes per hand.
- Check the gel lift: gently push back with an orangewood stick or plastic cuticle pusher. If stubborn, rewrap for a few more minutes.
- Use the electric nail drill file on a low speed to ease the remaining gel from the nail plate. Avoid excessive pressure to protect the natural nail.
- Wipe away softened gel with cotton or a clean brush, then repeat acetone treatment if any gel remains.
- Buff the nail surface lightly with a buffer block to remove any residual shine and prep for new polish.
- Apply a cuticle oil or moisturizer to hydrate the nail bed immediately after removal.
- Clean the nails with a gentle brush to remove dust and oils before applying fresh polish or strengthening treatment.
- If you plan to reapply gel polish, cleanse thoroughly and rehydrate the nails for best adhesion.
- Discard used wraps and tools per local disposal guidelines and sanitize reusable items after each use.
Troubleshooting
| Symptom | Likely Cause | Fix | Prevention |
|---|---|---|---|
| Gel won’t lift after 15 minutes | Insufficient acetone penetration or thick gel layer | Rewrap with fresh acetone-soaked materials and recheck after 5–10 minutes | Buff lightly before rewrapping to increase porosity |
| Nail plate feels dry or brittle | Overexposure to acetone | Limit soaking time, apply hydration balm after removal | Alternate between acetone and non-acetone removal methods when possible |
| Residual gel remains near edges | Gel application was very thick or uneven | Use gentle mechanical removal with a buffer or drill at low speed | Thin coats and proper curing during initial gel application |
| Foil wraps slip off | Wraps not snug or skin oils interfere | Rewrap tightly after wiping skin clean | Clean skin and nails before wrapping; avoid oils around the nail |
Common Mistakes
- Over-soaking nails in acetone, leading to excessive dryness
- Forcing gel off or peeling rather than using proper softening steps
- Using high-speed drills without protective care, risking nail bed damage
- Skipping prep steps like buffering, which can compromise adhesion of new polish
- Neglecting post-removal hydration and conditioning
Tips For Best Results
- Work in a well-ventilated area to minimize fumes from acetone
- Always protect the skin around the nails with barrier cream or tape
- Choose a low-speed setting on the electric drill and light pressure
- Hydrate nails immediately after removal with cuticle oil or a rich moisturizer
- Test a small area first if you’re unsure about sensitivity
Call A Professional
Seek a professional if there is persistent redness, pain, or prolonged sensitivity after removal. Consider visiting a salon if gel has deeply adhered to the nail bed or if you suspect damage to the natural nail. Stop immediately if you notice unusual discoloration or nails that crack or peel severely.
FAQ
Can I use non-acetone remover for gel polish?
Non-acetone removers are generally ineffective for gel polish and can require harsher mechanical methods that risk nail damage.
Is foil wrap removal safe for natural nails?
When done correctly with proper protection and hydration, foil wrap removal is a safe method for gel removal.
How long should I let the wraps sit?
Typically 10–15 minutes per hand, but adjust based on gel thickness and product instructions.
Do I need to buff after removing gel?
Yes, light buffering helps remove residual gloss and prepares a smooth surface for new polish.
What about hydration after removal?
Apply cuticle oil or a nourishing lotion to rehydrate the nail and surrounding skin.
Can I reuse foil wraps?
Foil wraps are usually disposable and should be replaced for hygiene reasons.
Is drill removal safe at home?
It can be safe with low speed, gentle pressure, and proper protection; otherwise, consult a pro.
Buying Guide
Choosing the right gel nail polish removal and prep kit depends on several factors. Consider the size of your hands and the number of nails you service. Noise level and energy efficiency matter for home use. Look for tools with comfortable handles and reliable performance. Controls should be intuitive, and a kit that includes protective items helps prevent skin exposure.
Key buying factors include size and capacity of foil wrap kits, the effectiveness of acetone, and compatibility of an electric drill with gel removal. Compare kits that bundle a nail buffer, cleaning brush, and application accessories. For home use, a compact, all-in-one kit may be more convenient, while pros may prioritize speed and durability. Review customer feedback and product safety certifications.
Would you benefit from a dedicated gel removal system or a modular set you can expand over time? A balanced selection often includes foil wraps, clips, a gel-removal drill, and a buffer block. Prioritize items designed for repeated use and easy cleaning to maintain sanitation standards.