Shutters add classic style and functional light control to American homes. Regular, proper cleaning extends their life and keeps interiors looking crisp. This guide walks through practical methods that work for most vinyl, wood, and faux shutter types, using common tools and a thoughtful approach to avoid damage.
Whether you’re refreshing a single window or tackling an entire home, a systematic routine makes shutter care simple and efficient. The steps here emphasize safety, proper technique, and the best combinations of tools to achieve spotless results.
Quick Answer
Choose a gentle approach first: dry dusting with a microfiber duster, then follow with a light damp wipe using a soft brush cleaning kit or microfiber cloths. For stubborn grime, a vacuum with a soft-bristle attachment helps lift dirt without scratching surfaces. Always dry the shutters after any damp cleaning to prevent moisture damage.
What You’ll Need
- Telescoping microfiber duster for shutters
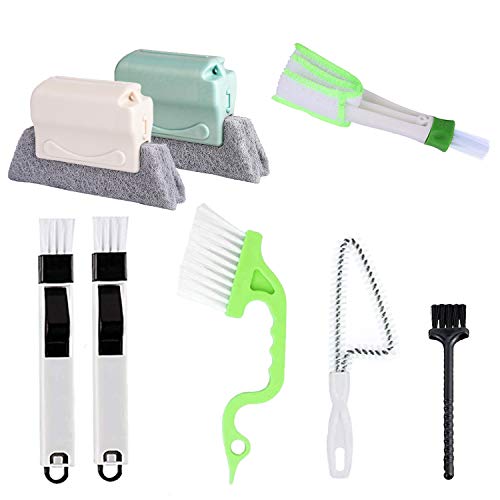
- Soft brush shutter cleaning kit
- Vacuum attachment for blinds and shutters with soft bristles
- Shutter cleaning kit with brush sponge microfiber cloth
- Vinyl shutter cleaning brush and sponge set


Before You Start
Protect floors and surrounding surfaces with a drop cloth or old towels. Open windows or doors to promote airflow and help dry time. Work from top to bottom to prevent re-saving dirt on already cleaned areas. Test a small, inconspicuous area first if you’re unsure how a material will react to moisture. For high, hard-to-reach shutters, a stable ladder or step stool is essential, along with a helper for safety.
Step-By-Step: How To Clean Shutters
- Assemble the cleaning tools and extensions. Attach the microfiber head to the telescoping pole for high, wide, or awkward angles.
- Dust the slats with a light, long stroke from the top edge to the bottom to capture loose dirt before moisture is used.
- Use a vacuum attachment with soft bristles to pick up remaining dust from both sides of each slat, working slowly to avoid bending.
- Dip a sponge or cloth into a mild cleaning solution or plain water, then wring out thoroughly. Wipe the flat faces of the slats in the same top-to-bottom direction.
- For stubborn grime, switch to the soft brush shutter cleaning kit or vinyl shutter cleaning brush and sponge set. Scrub gently in a circular motion along each slat, avoiding excessive moisture.
- Pay attention to the gaps between slats. If needed, use a dry cotton swab or microfiber tip to lift embedded dust from crevices.
- Rinse or wipe away any soap residue with a clean, damp cloth, ensuring no damp spots remain that could warp wood or stain vinyl.
- Dry thoroughly with a clean, dry microfiber cloth or allow air to circulate. Do not leave shutters damp for extended periods.
- Repeat the process for each window, moving room by room to maintain a steady workflow and reduce cross-contamination of dust.
- Inspect hardware and tracks for buildup. Wipe hinges or louvers gently to restore operation and prevent stiffness.
- Store tools clean and dry for the next cleaning cycle, keeping accessories organized for quick future use.
Troubleshooting
| Symptom | Likely Cause | Fix | Prevention |
|---|---|---|---|
| Dust remains after dusting | Cloth left too damp or missed crevices | Switch to dry, then re-clean crevices with a dry brush | Always complete a top-to-bottom pass before damp cleaning |
| Streaks after damp wipe | Soap solution residue | Rinse with a clean damp cloth and dry | Use minimal solution and wipe evenly |
| Slats sticking or squeaking | Moisture in hinges or buildup | Dry thoroughly; apply minimal lubricant if advised by manufacturer | Keep slats dry and clean |
| Fading or warping after cleaning | Excess moisture or harsh cleaners | Use gentle cleaners and avoid soaking | Test first; follow care instructions for material |
Common Mistakes
- Using excessive water on wood or unfinished surfaces
- Cleaning with abrasive brushes that scratch slats
- Forgetting to dry shutters after washing, leading to warping
- Cleaning from bottom to top, which reintroduces dust on cleaned areas
Tips For Best Results
- Schedule a monthly light cleaning to prevent heavy buildup and reduce scrubbing time.
- Keep a dedicated set of tools for shutters to avoid transferring grease from other cleaning chores.
- Consider using a soft microfiber cloth for quick daily touch-ups between deeper cleanings.
- For very high or tall shutters, a telescoping tool reduces the need for ladders and increases safety.
- Avoid harsh chemical cleaners that can damage finishes or fade colors over time.
Call A Professional
Seek professional help if shutters are cracked, warped beyond restoration, or if mechanisms fail to operate smoothly after cleaning. If any cleaning involves electrical components or motorized systems, contact an authorized service provider. Signs to call a pro include persistent sticking, loud grinding, or visible damage to louvers or frames.
FAQ
What is the best tool for cleaning blinds and shutters?
The best approach combines a microfiber duster, a soft-bristle brush kit, and a vacuum attachment to lift dust and grime safely.
Can I use water on wooden shutters?
Yes, but use a light damp wipe and dry promptly to avoid swelling or warping.
How often should shutters be cleaned?
Light dusting every couple of weeks and a deeper clean every 1–3 months, depending on exposure to dust and humidity.
Are chemical cleaners required?
No. Gentle cleaners or plain water are typically sufficient; avoid harsh solvents on delicate finishes.
Is it safe to clean shutters with a vacuum?
Yes, with a vacuum attachment that has soft bristles and on a low setting to prevent damage.
Should I remove shutters to clean them?
Typically not needed; most shutters are manageable with extendable tools and careful technique.
Buying Guide
When selecting shutter-cleaning tools, consider size, reach, material compatibility, and ease of use. Look for telescoping handles that extend to reach high interiors without a ladder. Noise level matters if you live in a shared space or apartment. Energy efficiency isn’t a factor for cleaning, but choosing durable, reusable tools saves money and waste. Consider a kit that combines a microfiber duster, soft-bristle brush, and sponge components for versatile cleaning. Placement matters: select tools with adjustable heads that fit your window configurations and louver spacing. Compare sets by what each kit can clean efficiently—wood, vinyl, and faux shutter surfaces often respond best to different materials. Finally, read product reviews focusing on durability, bristle softness, and ease of cleaning between uses to ensure long-term satisfaction.