Keeping a shower surround clean helps prevent mold, mildew, and soap scum buildup while preserving the tile and grout. This guide offers a practical, step-by-step approach using common bathroom tools to achieve a sparkling, maintenance-friendly shower space.
Quick Answer
Fast method: Gather the right tools, spray a no‑rinse cleaner or a vinegar‑baking soda mix, scrub with a grout brush for shower tiles and a tile cleaning brush set for corners, rinse thoroughly, and dry with a silicone blade squeegee to prevent water spots. For tough corners, a handheld steam cleaner for bathroom shower can lift grime without harsh chemicals.
What You’ll Need
- Grout brush for shower tiles
- Shower scrub brush with long handle
- Handheld steam cleaner for bathroom shower
- Shower door squeegee silicone blade
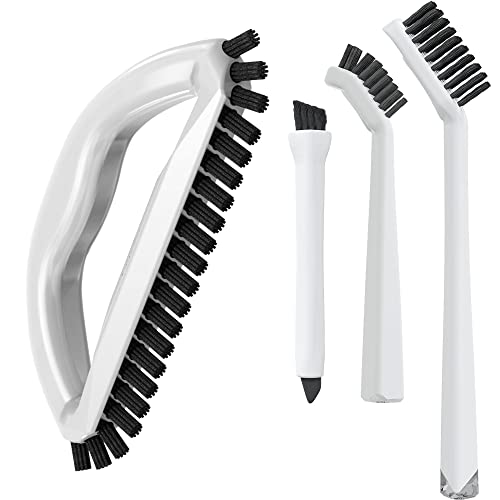
- Tile cleaning brush set for shower corners


Before You Start
Before cleaning, ventilate the bathroom by turning on the exhaust fan or opening a window. Remove items from the shower stall and rinse surfaces with warm water to loosen grime. Test any cleaner on a small, inconspicuous area to ensure it won’t discolor grout or tile. Allow 15–30 minutes for dwell time on built‑up soap scum in stubborn areas. Safety note: wear gloves and avoid mixing cleaners with bleach or ammonia, which can create dangerous fumes.
Step-By-Step: How To Clean A Shower Surround
- Clear the shower and rinse surfaces with warm water to remove loose soap and hair.
- Apply a cleaner appropriate for tile and grout. A commercial tile cleaner or a homemade mix of vinegar and baking soda works well on ceramic and porcelain surfaces.
- Use the grout brush for shower tiles to scrub grout lines, focusing on discolored or mildewed sections. Use short, firm motions for best results.
- Switch to the shower scrub brush with long handle for higher walls and larger areas to prevent kneeling or bending.
- Tackle corners and tight gaps with the tile cleaning brush set for shower corners; reach behind shelves and around door tracks as needed.
- If soap scum persists, use the handheld steam cleaner for bathroom shower to lift grime with heat and moisture. Allow surfaces to dry briefly after steaming.
- Rinse all surfaces thoroughly with clean water, removing cleaner residue that can attract more grime.
- Dry the shower with a shower door squeegee silicone blade to remove standing water and prevent mineral deposits.
- Inspect grout lines for remaining discoloration. Repeat targeted brushing if necessary.
- Replace items and rinse the floor quickly to minimize slip hazards.
- Seal grout if it’s part of your routine, following the manufacturer’s guidance and allowing full curing time before use.
Troubleshooting
| Symptom | Likely Cause | Fix | Prevention |
|---|---|---|---|
| Persistent staining in grout | Mold or deep mineral buildup | Spot‑clean with concentrated cleaner and re‑brush grout | Regular weekly cleaning to prevent buildup |
| Soap scum on tiles | Sticky residue from soap and shampoo | Use a non‑abrasive cleaner and soft brush | Rinse after each shower and dry with squeegee |
| Streaks after cleaning | Cleaner residue | Rinse thoroughly and wipe dry | Use minimal cleaner and ensure complete rinsing |
| Grout crumbling | Age and wear, damaged grout | Repair or re‑grout affected areas | Seal grout and perform periodic maintenance |
Common Mistakes
- Using abrasive pads on delicate tile or grout
- Mixing cleaners that create harmful fumes, such as bleach with ammonia
- Forgetting to rinse and dry surfaces, leading to new deposits
- Overlooking hidden spots behind shelves or along door tracks
Tips For Best Results
- Schedule a quick weekly wipe‑down using a soft brush for grout and a squeegee for glass doors.
- Choose a pH‑balanced cleaner to protect grout sealer and tile glaze.
- Keep the grain brush for shower corners dry between uses to prevent mildew growth.
- If you have hard water, use a descaling solution periodically to minimize mineral buildup.
- Store cleaning tools in a dry, ventilated area to extend their life.
Call A Professional
Seek professional help if: grout is heavily cracked or mold has penetrated deep into walls; tile or surrounding caulk shows extensive damage; stubborn stains persist after repeated cleaning; or you notice leaks around the shower base. A pro can re‑grout, reseal, or replace affected components to restore the shower surround integrity.
FAQ
How often should I clean a shower surround?
Regular light cleaning weekly plus a thorough deep clean every 1–2 months helps prevent buildup.
Can I clean grout with household vinegar?
Vinegar is effective on mineral buildup but avoid on certain natural stone faces where acidity can damage the surface.
Is steam cleaning safe for all shower surfaces?
Steam works well on tile and glass but test first on delicate materials and avoid steam directly on grout seals that might degrade over time.
When should I reseal grout?
Seal grout after deep cleaning or if water no longer beads on the surface, typically every 6–12 months depending on use and porosity.
Buying Guide
Choosing the right tools to clean a shower surround depends on material, grime level, and preferred effort. Consider the following factors to optimize performance and ease of maintenance.
Size and Coverage
Choose tools with an ergonomic grip and appropriate head size to match your shower footprint. A long‑handled scrub brush helps reach high corners without bending excessively, while a compact grout brush excels in tight joints.
Noise Level
Manual brushes are silent and simple, while an electric handheld steam cleaner may create noise but can reduce scrubbing time and improve disinfection.
Energy Efficiency
Manual cleaning consumes no electricity, while steam cleaning uses energy. If you prefer eco‑friendly routines, limit steam use to stubborn areas and rely on brushes for general cleaning.
Controls and Usability
Look for comfortable handles, non‑slip grips, and interchangeable heads. A silicone blade squeegee provides quick surface drying with minimal effort.
Placement and Storage
Store brushes in a ventilated caddy or hanging rack to dry between uses. Keep a small spray bottle of cleaner within arm’s reach for quick touch‑ups after showers.
Material Compatibility
Ensure brushes and scrub heads are suitable for your tile, grout, and sealant type. Avoid metal pads on glazed surfaces to prevent scratches.