Sealed grout helps repel stains and moisture, but it still requires regular cleaning to keep tile lines looking fresh. This guide outlines practical steps to clean sealed grout effectively, using common tools and household cleaners while protecting surrounding tiles.
Whether you’re refreshing a kitchen backsplash, bathroom shower, or entryway, a systematic approach makes grout lines brighter and prevents grime buildup over time.
Quick Answer
Best starter approach: Use a grout cleaning brush or a grout steam cleaner for sealed grout to loosen grime, then rinse well. For stubborn stains, apply a gentle paste and scrub with a soft brush, finishing with a thorough rinse and dry.
What You’ll Need
- Sealed grout cleaner brush with scrub head
- Grout cleaning brush for sealed grout tiles
- Tile grout steam cleaner for sealed grout
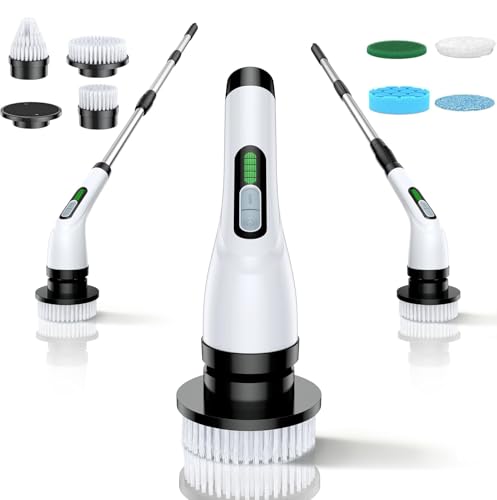
- Electric grout cleaning tool with rotating brush
- Grout cleaning kit with sponge and scrubber for sealed grout


Before You Start
Prepare a small, well-ventilated area and protect adjacent surfaces with towels or plastic sheeting if needed. Test any cleaner on a hidden area of grout to ensure no discoloration. Allow the grout to air-dry fully between passes. Time estimates vary, but plan about 30–60 minutes for a standard bathroom or kitchen section. Do not use harsh chlorine bleach on colored grout as it can cause fading.
Step-By-Step: How To Clean Sealed Grout
- Dry brush the area to remove loose dust and debris with a grout cleaning brush for sealed grout tiles or an electric grout cleaning tool with rotating brush.
- Mix a gentle cleaning solution (a few drops of dish soap in warm water) in a spray bottle or bucket.
- Spray or apply the solution to the grout lines and let it sit for 5–10 minutes to loosen grime.
- Scrub along the grout lines with a sealed grout cleaner brush with scrub head or an electric rotating brush until stains lift.
- For stubborn stains, make a paste with baking soda and water, apply to grout, and scrub with a stiff brush until the paste turns gray.
- Rinse thoroughly with clean water or a steam-cleaning session using a tile grout steam cleaner for sealed grout to remove residue.
- Inspect grout for remaining stains; repeat scrubbing and rinsing if necessary.
- Dry the entire area with a clean towel to prevent any moisture from seeping into porous areas.
- Seal grout again only after it is completely dry if your grout sealer requires reapplication time.
- Maintain by performing a light weekly wipe-down and a deeper clean monthly using appropriate tools.
Troubleshooting
| Symptom | Likely Cause | Fix | Prevention |
|---|---|---|---|
| Streaks after cleaning | Residue from cleaner | Rinse with clear water and dry thoroughly | Use minimal soap and avoid over-wetting |
| Grout color fade | Inappropriate cleaner for sealed grout | Switch to a cleaner formulated for sealed grout | Test cleaners on inconspicuous area first |
| Persistent mold or mildew | Moisture retention or poor ventilation | Increase drying time and improve airflow | Wipe tiles dry after showers; use a bathroom fan |
| Cracking or flaking grout after cleaning | Overly aggressive scrubbing or incompatible sealant | Limit force and confirm sealer compatibility | Follow manufacturer guidelines for sealing intervals |
Common Mistakes
- Using harsh acids or bleach on colored grout
- Over-wetting grout during cleaning, which can weaken the seal
- Skipping a full rinse, leaving cleaner residues behind
- Scrubbing too aggressively with stiff brushes, causing damage
Tips For Best Results
- Choose tools designed for sealed grout, such as a grout cleaning brush with a rotating head or a dedicated grout steam cleaner for sealed grout.
- Schedule regular light maintenance to prevent heavy buildup.
- Ventilate the area during cleaning and drying to speed up moisture removal.
- If grout color is uneven after cleaning, consider a color-safe grout stain or re-application of sealer as needed (per product guidelines).
- Always follow the sealer’s recommended drying and curing times before exposure to moisture.
Call A Professional
Consider professional help if grout is severely discolored, cracked, or if sealing requires a complete re-surface. Stop and contact a pro if you notice persistent mold growth, extensive grout damage, or if using steam cleaning raises concerns about water intrusion near electrical fixtures.
FAQ
Is steam cleaning safe for sealed grout?
Yes, when used according to the manufacturer’s instructions, steam cleaning can effectively loosen grime on sealed grout without chemicals.
How often should I clean sealed grout?
Light maintenance weekly and a deeper clean monthly helps prevent buildup and maintains the seal.
Can I use vinegar on sealed grout?
Vinegar is acidic and may affect some seals; test a small area first or use a cleaner formulated for sealed grout.
Do I need to reseal grout after cleaning?
Resealing depends on the product and wear; follow the sealer’s guidance and check grout porosity periodically.
What tools work best for large tiled areas?
Electric grout cleaning tools with rotating brushes or tile grout steam cleaners cover large areas efficiently while reducing manual effort.
How can I prevent future staining?
Clean spills promptly, ensure proper ventilation, and maintain a consistent sealing schedule as recommended by the grout sealer.
Buying Guide
When choosing tools and products for cleaning sealed grout, consider size, efficiency, and ease of use. For large spaces, a tile grout steam cleaner or an electric grout cleaning tool with rotating brush can speed up work. Noise level is a practical factor for apartments or homes with open floor plans. Look for energy-efficient models and those with multiple brush heads to tackle different grout widths. Controls should be simple—regardless of device, ensure it’s easy to assemble, use, and clean. Placement considerations include storage size and whether you need a handheld option or a more comprehensive stationary system. Compare kits that include sponge and scrubber components to reduce the number of separate purchases, and verify compatibility with your grout type and sealer for best results.