Louvered doors can add stylish ventilation to rooms, but their slatted design also collects dust and grime. A careful cleaning routine helps maintain airflow and appearance without damaging the slats. This guide covers practical steps, the right tools, and best practices for American homes.
Quick Answer
To clean louvered doors efficiently, use a microfiber cloth or a dedicated louvered door dusting brush, then follow with an extendable dusting wand for hard-to-reach areas. For stubborn buildup, apply a light cleaning solution with a damp cloth and dry immediately to prevent moisture damage.
What You’ll Need
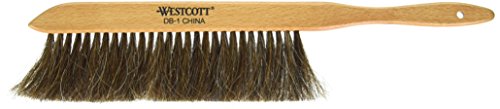
- louvered door dusting brush
- extendable dusting wand for blinds louvers
- microfiber cloth for louvered doors cleaning
- slim vent brush for louvered doors
- adjustable pole blind cleaning tool louvers
- optional mild cleaner or water


Before You Start
Clear the area and remove any delicate items near the doors. If the doors are on hinges that swing, lay a protective cloth to catch falling dust. Test any cleaner on a small, inconspicuous area first to avoid staining. Time estimate: 15–30 minutes for a standard interior door. Handle the slats gently to prevent bending and avoid excessive moisture that can warp wood or damage finishes.
Step-By-Step: How To Clean Louvered Doors
- Inspect the doors for loose slats or hardware. If any parts are damaged, address them before deep cleaning to prevent further issues.
- Attach the louvered door dusting brush to your extendable wand or pole. This tool allows you to reach both sides of the slats without bending.
- Brush the top and bottom edges of each slat from the outer edge inward to dislodge loose dust.
- Use the slim vent brush for tight spaces where dust collects between adjacent slats. Work slowly to avoid bending the slats.
- Wipe with a microfiber cloth for louvered doors cleaning to pick up fine dust that brushing alone may miss.
- If stubborn grime is present, lightly dampen a microfiber cloth with water or a mild cleaner, then wipe along the slats. Dry immediately with a dry cloth or air dry.
- Open the door slightly and clean the inner faces in the same manner, ensuring both sides receive even attention.
- For larger doors, repeat on the opposite panel, using a different section of the cloth to avoid redistributing dust.
- Touch up any remaining dust spots with the extendable dusting wand, focusing on the corners and between slats.
- Return any moved items to their place and admire the refreshed look of your louvered doors.
- Schedule regular cleanings—monthly light dusting and quarterly deeper clean can maintain air flow and appearance.
Troubleshooting
| Symptom | Likely Cause | Fix | Prevention |
|---|---|---|---|
| Dust reappears quickly | Insufficient cleaning frequency | Increase cleaning cadence and use an extendable wand for better reach | Establish a routine; keep tools accessible |
| Slats bend during cleaning | Excessive pressure | Use light strokes and supporting hands; consider a softer brush | Choose gentler tools and avoid forcing the brush between tight gaps |
| Moisture leaves water marks | Over-wetting the cloth | Wring cloth well and use minimal moisture | Prefer dry methods and spot-clean only when needed |
| Dust trails on floor or furniture | Dust falls during cleaning | Place a cloth or mat under the door and cover nearby surfaces | Dust before you mop or vacuum nearby areas |
Common Mistakes
- Using harsh brushes that bend or scratch slats
- Soaking slats with too much liquid, especially on wood or veneer
- Cleaning only one side of the door and neglecting the opposite panel
- Rushing through corners where dust accumulates
Tips For Best Results
- Maintain an accessible cleaning kit with a dedicated louvered door brush and extendable wand for quick dusting.
- Dust from top to bottom to prevent dust from settling on cleaned surfaces.
- Opt for microfiber materials, which trap dust better than plain cloths.
- Consider a light vacuum attachment designed for blinds if a very dusty environment is common.
- Schedule a deeper clean seasonally, focusing on between slats to prevent buildup.
Call A Professional
Seek professional help if louvers are severely bent, split, or if painting or refinishing is needed. Contact a pro when doors are structurally damaged, or if cleaning reveals moisture damage, warping, or persistent staining that affects aesthetics or door function.
FAQ
How often should I clean louvered doors?
Light monthly dusting plus a deeper quarterly clean helps maintain airflow and appearance.
Can I use water on wooden louvered doors?
Yes, but use minimal moisture and dry promptly to avoid warping or finish damage.
What tools are best for tight slats?
A slim vent brush and an adjustable pole cleaning tool help reach narrow gaps without bending slats.
What should I do if dust remains after cleaning?
Switch to a microfiber cloth and use targeted strokes along each slat, then re-dust with a wand for stubborn spots.
Buying Guide
When choosing tools for cleaning louvered doors, consider size, reach, and surface care. For most American homes, a compact louvered door dusting brush paired with an extendable dusting wand offers reach without sacrificing control. Look for soft bristles to prevent marring, especially on wood finishes. Microfiber cloths excel at trapping dust and allergens, but ensure they are lint-free to avoid residue on slats.
Noise level matters in living rooms and bedrooms, so select brushes and wands with smooth, low-noise bristles. Energy efficiency is not a direct factor here, but choosing durable, reusable tools reduces waste and lowers long-term costs. Controls on the cleaning tools should be simple—adjustable poles that lock securely prevent slips during use. Placement considerations include storing tools near the door for quick access and avoiding clutter in high-traffic areas.
For multi-room cleaning, consider an extendable wand for blinds louvers to reach higher cabinets or ceiling gaps. A slim vent brush is valuable for tight spaces, while a dedicated microfiber cloth ensures effective dust pickup. Finally, check compatibility with your door material—wood, composite, or painted surfaces may require different care approaches to avoid damage.