Keycaps can accumulate dust, oils, and grime over time, affecting both feel and aesthetics. This guide walks through a balanced, step-by-step approach to clean keycaps safely and effectively, whether you’re a casual user or a keyboard enthusiast aiming for a pristine setup.
Quick Answer
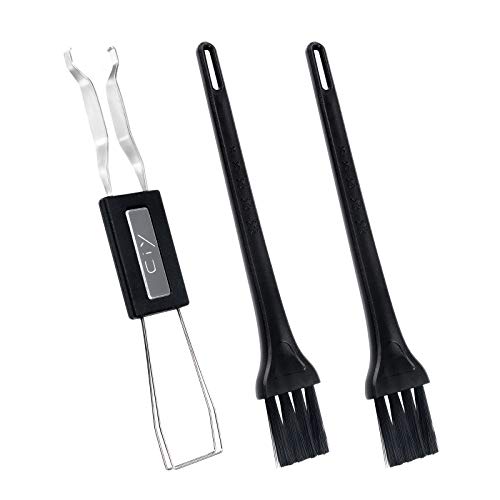
Begin with a gentle dry brush to remove loose debris, then lift keycaps with a keycap puller tool stainless steel. For thorough cleaning, soak caps in warm soapy water, scrub with a keycap cleaning brush set, and dry completely before reassembling. For stubborn stains, use an ultrasonic cleaner for keycaps or silicone keycap cleaning putty for keyboards as a supplemental step.
What You’ll Need
- Keycap cleaning brush set
- Keycap puller tool stainless steel
- Keyboard cleaning kit with keycap puller brush
- Ultrasonic cleaner for keycaps
- Silicone keycap cleaning putty for keyboards
- Warm water and mild dish soap
- Microfiber towels or air blower


Before You Start
Work on a clean, flat surface and keep track of which key belongs where. Disconnect the keyboard from power and any connected devices. If your keyboard uses a hot-swap PCB or has stabilizers, note that some keycaps may require extra care during removal. Plan for about 20–40 minutes for a complete cleaning, depending on the number of keys and the method chosen.
Safety note: Avoid soaking electronics directly, and never immerse non-removable components unless the manufacturer permits it. Be gentle when removing stabilizers or larger caps to prevent wobbly or re-sticky inserts.
Step-By-Step: How To Clean Keycaps
- Power down and unplug the keyboard.
- Use a keycap puller tool stainless steel to gently lift each keycap from the keyboard, keeping them organized by row or cluster.
- Place caps in a basin of warm water mixed with a few drops of mild dish soap.
- Swirl the water and let caps soak for 5–10 minutes to loosen oils and dirt.
- Use a keycap cleaning brush set to scrub each cap, paying attention to legends and textured surfaces.
- Rinse caps with clean water and lay them on a towel to air-dry completely.
- If deeper grime remains, use a silicone keycap cleaning putty for keyboards to lift embedded debris from between characters.
- For a deeper clean, consider an ultrasonic cleaner for keycaps. Run a short cycle (as per device instructions), then rinse and dry.
- While caps dry, wipe the keyboard body with a slightly damp microfiber cloth, avoiding openings where moisture could enter.
- Reinstall dried keycaps in their original positions, testing each switch as you go.
- Optionally, for stubborn residues or fluorescent legends, repeat the process on affected caps.
Troubleshooting
| Symptom | Likely Cause | Fix | Prevention |
|---|---|---|---|
| Caps still sticky after washing | Oils or dyes from the plastic | Soak longer in mild soap solution; scrub with a bristle brush | Regular cleaning schedule; avoid long exposure to oils |
| Legends fading | Harsh cleaners or abrasion | Use gentle soap and soft brushes; avoid abrasive pads | Store caps away from direct sunlight and heat |
| Caps don’t fit or sit uneven | Caps not aligned or damaged stems | Check placement, realign, or replace worn caps | Keep caps organized by position; inspect for cracks |
| Moisture in keyboard after cleaning | Water seepage into PCB | Dry caps thoroughly; use compressed air to blow out joints | Avoid submerged soaking near the switch area |
Common Mistakes
- Over-soaking caps in water, especially if they have printed legends that can bleed.
- Using hot water or aggressive solvents that warp or fade legends.
- Forgetting to dry caps completely before reassembly, leading to moisture in switches.
- Forgetting to label and track key positions, causing layout mix-ups.
Tips For Best Results
- Do a quick dry-brush pass before disassembly to remove loose dust and crumbs.
- Use the keycap puller tool stainless steel for safer removal; avoid metal tweezers that can scratch caps.
- Separate slippery or textured caps and treat differently if needed to avoid label fade.
- Establish a routine: monthly light cleaning or quarterly deep cleaning depending on usage.
- When using an ultrasonic cleaner for keycaps, keep temperature moderate and monitor cycle duration to prevent damage.
Call A Professional
Stop and consult a professional if you notice swelling, cracking, or warping of keycaps, or if the keyboard itself shows signs of moisture intrusion or keyboard PCB damage. Seek expert help if you are unsure about stabilizers, backlighting, or when keycaps are part of a premium or custom set.
FAQ
Can I clean keycaps without removing them?
Yes, but removal allows for deeper cleaning of both caps and switches. A quick wipe can remove surface dust, though.
Are all keycaps safe to soak in soap and water?
Most standard ABS/PBT keycaps are, but some legends or double-shot caps require gentler handling and may tolerate shorter soaks.
Will an ultrasonic cleaner damage keycaps?
When used with proper settings and short cycles, ultrasonic cleaners are generally safe for keycaps but avoid high heat or extended cycles on delicate sets.
How often should I clean keycaps?
Light monthly cleaning is common; a thorough quarterly cleaning is typical for most households.
What if a keycap won’t reseat properly after cleaning?
Inspect the stem and stabilize clips for wear; realign the cap to the proper row and try again.
Is silicone keycap cleaning putty effective for all grime?
Putty is great for residue in between keys but may not remove oil or pigment stains on legends as effectively as a brush scrub.
Buying Guide
Choosing the right accessories for keycap care depends on your keyboard setup and cleaning habits. Consider these factors to assemble a practical kit tailored to American keyboards and usage patterns.
Size and compatibility: Ensure tools fit your keyboard layout and keycap sizes, especially for larger keycaps like the spacebar or enter keys. A compact keycap puller is useful for 60% and less, while a larger tool may help for full-sized keyboards.
Noise level: Some cleaning tools can be quiet (brushes and silicone putty) while others may create noise during use. Balance comfort with effectiveness when cleaning in shared spaces.
Energy efficiency: Ultrasonic cleaners consume little energy per cycle; choose models with efficient heaters and timers to minimize usage while maximizing results.
Controls and settings: Look for adjustable cycle times and temperature settings on ultrasonic cleaners. Simple, reliable controls reduce the risk of operator error.
Placement: Dedicate a well-ventilated, labeled cleaning station. A shallow tray for soaking helps manage water and reduces spills on desks or keyboards.
Brand and compatibility: Consider established brands for keycap cleaning kits and pullers to ensure consistent sizing and safe operation with widely used keycaps.