Maintaining a clean hydration bladder is essential for preventing bacteria growth and ensuring a fresh taste in every sip. This guide provides practical steps for American users to clean, sanitize, and care for their hydration systems using common tools and specialized cleaning products.
Quick Answer
Rinse the bladder with warm water, scrub the interior with a dedicated hydration reservoir cleaning brush set, clean the bite valve with a bite valve cleaning brush, soak with hydration bladder cleaning tablets as directed, rinse thoroughly, and air-dry completely before storage.
What You’ll Need
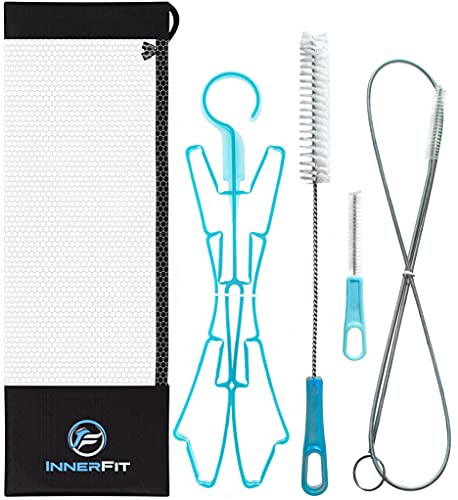
- Hydration bladder cleaning kit
- Hydration reservoir cleaning brush set
- CamelBak hydration bladder cleaning kit
- Bite valve cleaning brush for hydration bladder
- Hydration bladder cleaning tablets


Before You Start
Prepare a clean workstation and gather all tools. Empty the bladder completely and rinse out any remaining liquid. Use warm (not hot) water to avoid damaging seals. Allow plenty of time for drying to prevent mold growth. Wear protective gloves if you are sensitive to cleaning solutions. Plan for a 15–30 minute cleaning window, plus drying time.
Step-By-Step: How To Clean A Water Bladder
- Empty and Rinse: Completely drain the bladder, then rinse with warm water to remove loose debris.
- Disassemble Components: Remove the bite valve, straw, and any removable hoses according to the manufacturer’s design.
- Interior Scrub: Use the hydration reservoir cleaning brush set to scrub the interior walls and corners. Pay attention to the nozzle and seam areas.
- Valve Cleaning: Use the bite valve cleaning brush for thorough scrubbing of the bite valve and valve channels to remove residue.
- Soak With Tablets: Mix hydration bladder cleaning tablets in water as directed on the package, and soak the bladder and components for the recommended time.
- Rinse Thoroughly: After soaking, rinse all parts multiple times with fresh warm water to remove any cleaning residue.
- Air-Dry Completely: Invert the bladder and hang it in a well-ventilated area. Ensure all components are fully dry before reassembly.
- Reassemble and Store: Once dry, reassemble the system and store in a cool, dry place away from direct sunlight to prevent material degradation.
Troubleshooting
| Symptom | Likely Cause | Fix | Prevention |
|---|---|---|---|
| Persistent odor after cleaning | Residual cleaning solution or bacteria | Re-clean with tablets and ensure complete rinsing | Rinse thoroughly and dry fully after each use |
| Valve leaks or stuck valve | Deposition or improper reassembly | Inspect seals and re-seat valve; replace if damaged | Regular, gentle cleaning; avoid over-tightening |
| Mold growth inside bladder | Incomplete drying | Soak with sanitizing tablets and extend air-drying time | Dry completely, store in a breathable bag |
| Discolored interior | Deep-set mineral deposits or residue | Use stronger cleaning solution or baking soda rinse; repeat | Regular cleaning after long trips and hard water use |
Common Mistakes
- Skipping the drying stage, which invites mold and odors
- Using hot water that warps seals and plastics
- Not cleaning the bite valve, which harbors bacteria
- Relying on a quick rinse without thorough scrubbing or soaking
Tips For Best Results
- Clean soon after use to prevent residue from hardening inside the bladder.
- Use a dedicated hydration bladder cleaning kit for reliable brushes and tools.
- Alternate cleaning methods with tablets for deeper sanitizing periodically.
- Keep replacement parts clean and check seals regularly for wear.
- Label your bladder with a date to track when it was last cleaned.
Call A Professional
Contact a pro if you notice persistent odors after multiple cleanings, visible mold you cannot scrub away, or any signs of material damage such as cracks or warping. Seek professional assistance for parts replacement or specialized cleaning if needed.
FAQ
How often should I clean my hydration bladder?
Clean the bladder after every trip or workout, and perform a deeper clean weekly or after exposure to questionable water sources.
Can I use household cleaners on my bladder?
Avoid harsh chemicals; use products designed for hydration systems or diluted cleaning tablets as directed.
Is it safe to soak the bladder overnight?
Yes, many tablets require soaking for several hours; follow the product instructions and rinse well afterward.
What storage best practices prevent mold?
Store with the bladder fully dry in a ventilated, cool place to discourage microbial growth.
What should I do if the bite valve leaks?
Inspect for cracks or loose fittings and replace the valve if needed.
Can I reuse cleaning tablets many times?
Typically, tablets are used per batch; reuse is not recommended as efficacy can diminish.
Are there alternatives to tablets?
Rinse with clean water and use a mild cleaning solution designed for hydration systems as an alternative.
Buying Guide
Choosing the right cleaning supplies for a water bladder involves considering size, material compatibility, and ease of use. Key factors include:
- Size and capacity: Ensure the kit and brushes fit your bladder’s dimensions and opening diameter.
- Compatibility: Select products designed for the brand of your hydration system to avoid damage.
- Cleaning power: Tablets should offer effective sanitizing without leaving residues; brushes should reach corners.
- Ease of use: Simple soaking times and clear instructions help maintain regular cleaning routines.
- Durability: Sturdy brushes and hose tools extend service life and reduce the need for replacements.
- Storage and drying aids: Racks or hooks help air-dry all components fully.
When comparing options, consider how often you travel, whether you frequently drink from questionable water sources, and the maintenance level you’re willing to commit to. A combined kit often provides the most convenience, offering brushes, tablets, and a dedicated bite valve tool in one package.