Keeping a camper’s air conditioning system clean helps it run efficiently, cooling more effectively, and extending the life of the roof-mounted unit. This guide walks through safe, practical steps for cleaning the condenser, coils, fins, and accessible components of a typical RV air conditioner.
Whether you rely on a roof-mounted unit or a compact roof installation, regular maintenance reduces energy use and prevents mold and mildew buildup inside the housing. The following steps focus on accessible cleaning tasks you can perform with common RV tools and consumer-friendly cleaners.
Quick Answer
Fast method: Disconnect power, access the exterior condenser coil, spray with a non-toxic coil cleaner, brush away debris with a dedicated cleaning brush kit, rinse gently, and re-seal the unit. Use a fin comb to straighten bent fins if needed, and finish with a light, non-corrosive rinse around the drainage area.
What You’ll Need
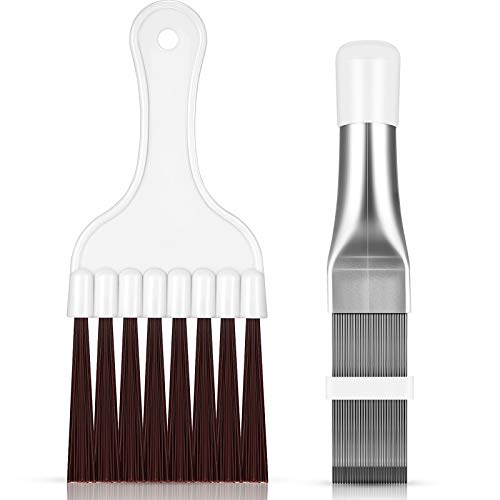
- RV air conditioner coil cleaning brush kit
- RV AC fin comb condenser fin cleaning tool
- non-toxic RV air conditioner coil cleaner spray
- camper trailer RV air conditioner maintenance kit
- roof-mounted RV AC unit cleaning brush


Before You Start
Preparation is essential. Turn off the RV’s power at the breaker panel and disconnect the unit from any electrical source. Remove debris from around the exterior vent and clear the area on the roof to prevent slipping. Protect the interior by closing vents and sealing the living space from dust. Plan for a time window of about 60–90 minutes, depending on unit access and any required fin straightening.
Safety cautions: Do not use high-pressure spray directly into the unit, which can bend fins or push water into the motor. Avoid corrosive cleaners; use a non-toxic, RV-safe coil cleaner. Wear eye protection and gloves when handling cleaning tools. If the roof seal around the unit shows wear or cracks, consider resealing to prevent leaks.
Step-By-Step: How To Clean A Camper AC Unit
- Access the exterior condenser area by removing any protective housing or grille and locate the coil surfaces and fins.
- Apply a non-toxic RV air conditioner coil cleaner spray to the visible coil surfaces according to the product instructions. Let it dwell briefly to loosen dirt and grime.
- Use an RV air conditioner coil cleaning brush kit to gently agitate the fins and coil surface, dislodging debris without bending the fins.
- For stubborn debris, employ the roof-mounted RV AC unit cleaning brush to reach tight or elevated areas on the unit’s exterior.
- Rinse the coil from the exterior with a light, low-pressure spray. Avoid directing water into the fan housing or drainage ports; let water flow toward the condensate drain.
- Inspect the condenser fins with the RV AC fin comb condenser fin cleaning tool and straighten any bent fins carefully, working from the fin tips toward the base.
- Wipe down accessible interior surfaces around the air handler and remove any accumulated dust or mold with a clean cloth or sponge.
- Reassemble the housing, seal the edges if needed, and restore power. Run the unit on a cool setting to verify smooth operation and listen for unusual noises.
- Schedule routine checks every season or after heavy use or wildfire smoke exposure, repeating the cleaning cycle as needed.
- Document maintenance dates to track when the next coil cleaning and fin check should occur as part of a camper maintenance routine.
- If water leakage or poor cooling persists after cleaning, proceed to troubleshooting steps or consult a professional for a more thorough diagnosis.
Troubleshooting
| Symptom | Likely Cause | Fix | Prevention |
|---|---|---|---|
| Unit runs but cool air is weak | Clogged condenser coil or dirty fins | Clean coils and straighten fins | Regular pre-season cleaning |
| Unpleasant odor | Mold in the housing or on ductwork | Clean interior surfaces; use mildew-safe cleaner | Improve ventilation and dry out the space after use |
| Water leakage around unit | Worn seals or improper drainage | Inspect seals; reseal if needed | Check drainage and seal integrity seasonally |
| Fin fins appear bent after cleaning | Rough handling with brush or fin comb | Carefully realign with fin comb | Use gentle techniques and proper tools |
| Fan or motor noise | Loose components or motor wear | Tighten fasteners; seek service if noise persists | Periodic inspection to catch looseness early |
Common Mistakes
- Using aggressive brushes that bend fins or scratch surfaces
- Spraying high-pressure water into the unit
- Using harsh chemicals that can corrode aluminum fins or seals
- Neglecting the interior air handler during cleaning
- Skipping safety steps or failing to disconnect power
By avoiding these missteps, RV owners can minimize downtime and maintain efficient cooling during trips.
Tips For Best Results
- Schedule coil cleaning at the start or end of the camping season for best airflow.
- Keep the exterior grille clean to reduce debris buildup on the coil.
- Match cleaning products to the manufacturer’s recommendations for non-toxic formulas.
- Use the fin comb to restore damaged fins before reassembling the unit.
- Maintain a steady maintenance cadence to prevent larger, costlier problems later.
Call A Professional
Seek professional service if you notice persistent cooling problems after cleaning, signs of refrigerant leakage, abnormal noises that don’t subside, or visible structural damage to the roof assembly. Stop and avoid attempting repairs that involve refrigerant lines or electrical components beyond basic maintenance.
FAQ
How often should I clean my camper AC unit?
Clean the condenser and accessible parts at least once per season, or more often if you travel in dusty, sandy, or wildfire-prone areas.
Can I use household cleaners on RV AC coils?
Avoid household cleaners that are harsh or corrosive; use a non-toxic RV coil cleaner spray designed for condensers.
Is it safe to spray water on the unit?
Yes, but use low pressure and avoid spraying into the fan housing or electrical components.
What should I do if the fins are severely bent?
Use a dedicated fin comb to straighten fins gradually, or consult a technician if damage is extensive.
Buying Guide
When choosing cleaning tools and accessories for camper AC maintenance, consider size, compatibility, and ease of use. A comprehensive maintenance kit should include a coil cleaning spray, a cleaning brush set, a fin comb, and a roof-access brush compatible with RV units. Look for non-toxic formulations to protect seals and rooftop finishes. For frequently dusty conditions, a longer reach brush helps access hard-to-reach coils. Consider a compact kit that fits inside a storage bin on the RV for on-the-go maintenance. Evaluate whether you need a dedicated roof vent brush to clean surrounding debris around the unit when parked under trees or in dusty lots.
Buying Guide (Continued): Key Factors
- Size and compatibility: Ensure tools fit the coil dimensions and are suitable for your RV model.
- Noise level: While cleaning, noise is not a primary concern, but consider tools with comfortable handles to reduce fatigue.
- Energy efficiency considerations: Regular cleaning helps maintain efficiency; performance improvements come from clean coils and fins.
- Controls and ease of use: Simple sprays and brushes reduce the risk of damage during maintenance.
- Placement and accessibility: Tools with extendable handles or roof-access capabilities help reach high-mounted units.
Thinking through these factors helps plan a maintenance routine that minimizes disruption and keeps RV summers cool. If in doubt, a maintenance kit designed for camper and trailer AC units provides the essential tools in one package.