Deposits and mineral buildup can collect inside faucet bodies, affecting water flow and sanitary performance. This guide shows practical, safe methods to access and clean the interior of common household faucets using specialized tools designed for interior cleaning and maintenance. It covers tools, preparation, step-by-step actions, troubleshooting, and prevention tips to keep faucets working smoothly.
Quick Answer
Target interior buildup first with an appropriate bottle descaler and interior cleaning brush, then use aerator tools to remove and clean any blockages. For most fixtures, you’ll disassemble the aerator and valve assembly, scrub with the right brushes, and reassemble with a tight, leak-free seal.
What You’ll Need
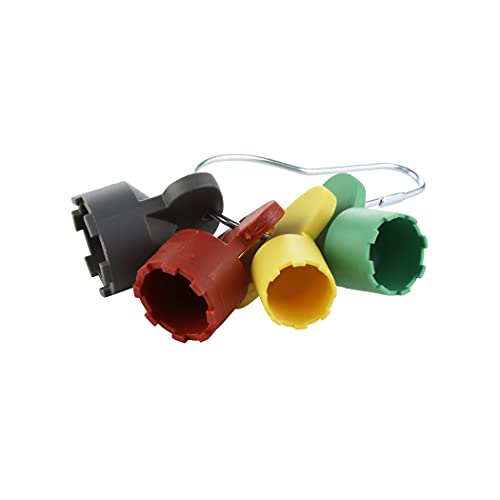
- faucet aerator cleaning tool kit
- faucet interior cleaning brush
- faucet descaler cleaning kit
- faucet aerator removal tool
- faucet cleaning brush set


Before You Start
Clear the counter and place a towel beneath the sink to catch drips. Turn off the water supply to the affected faucet to prevent leaks. If you must remove the faucet handle, follow manufacturer instructions and avoid forcing parts. Allow any assembled parts to come to room temperature before disassembly, and keep small pieces organized. Wear eye protection when using strong cleaners or descalers.
Estimated time: 30–60 minutes depending on faucet design and accessibility.
Step-By-Step: How To Clean Inside A Faucet
- Shut off the water supply to the faucet and relieve residual pressure by opening the faucet handle briefly.
- Remove the aerator using the faucet aerator removal tool and set aside bolts or screens for inspection.
- Inspect the aerator for mineral buildup; place it in a small container with faucet descaler cleaning kit solution to soak for 10–15 minutes.
- While soaking, use the faucet interior cleaning brush to scrub the interior cavities of the faucet body where accessible—focus on tight corners and valve seats.
- Operate the handle to expose any accessible valve or cartridge, then gently remove it if the design allows. Brush off deposits and rinse with clean water.
- Rinse the aerator parts under running water and use the faucet cleaning brush set to ensure all holes are clear; inspect for corrosion or wear.
- Reassemble the aerator and install it back onto the faucet using the faucet aerator removal tool to ensure a snug, leak-free fit.
- Turn the water back on slowly and run the faucet to flush air and any remaining debris. Check for leaks around the handles and connections.
- If flow improves but remains weak, repeat soaking with the descaler kit or repeat brush cleaning on interior parts not previously reached.
- For stubborn mineral buildup, repeat the soaking process one more time or consider a different descaler with a gentler action suitable for your faucet materials.
- Finally, re-test water flow at both hot and cold positions and ensure the aerator is clean and well-seated to maintain balanced pressure.
Troubleshooting
| Symptom | Likely Cause | Fix | Prevention |
|---|---|---|---|
| Low water flow after cleaning | Aerator partially clogged or not reinstalled correctly | Remove, clean thoroughly, and reseat with tool | Regularly inspect aerator |
| Noisy faucet | Debris in cartridge or seats | Disassemble, clean, and re-seat components | Rinse and dry parts before reassembly |
| Leaks around handle | Improper seal or worn o-rings | Replace seals or cartridges as needed | Handle with care; use correct torque |
| Persistent mineral buildup | Hard water causing scale | Apply descaler cleaning kit more frequently | Install a filtration system or water softener |
Common Mistakes
- Over-tightening after reassembly can damage threads and seals.
- Using aggressive brushes on delicate finish metals may scratch surfaces.
- Skipping the rinse step can leave residues that later affect flow.
- Assuming all faucet parts are universal; some models require specific tools or cartridges.
Tips For Best Results
- Match descaler strength to mineral buildup; avoid harsh formulas on sensitive finishes.
- Soak parts in descaler only as directed to prevent material damage.
- Keep a small parts tray to organize springs, screws, and o-rings during disassembly.
- Document each step or take photos to ease reassembly for complex faucets.
Call A Professional
Consider a pro if any of the following occur: persistent leaks after reassembly, damaged cartridges, corroded supply lines, or if you encounter unfamiliar component layouts. Complex faucet designs or hidden valves may require specialized tools and expertise.
FAQ
What is the best tool to clean inside a faucet?
The best approach uses a combination of the faucet interior cleaning brush and descaler kit, plus an aerator removal tool for thorough access to internal parts.
Can descaling damage my faucet?
When used as directed, descalers remove mineral buildup without harming most faucet materials; always check manufacturer recommendations.
How often should I clean inside a faucet?
Inspect and clean every 6–12 months, or more often in areas with very hard water.
Is it safe to remove the cartridge for cleaning?
Only if your faucet design allows cartridge removal; follow the manufacturer’s instructions to avoid damaging seals.
What should I do if leaks persist after cleaning?
Stop using the faucet, shut off water, and consult a professional for cartridge or seal replacement.
Are there eco-friendly descalers?
Yes, look for eco-friendly formulations that are safe for pipes and seals while effectively breaking mineral deposits.
Should I replace the aerator after cleaning?
If the aerator shows wear or corrosion, replacement is recommended for optimal performance.
Can I use baking soda or vinegar for interior cleaning?
Some mild cleaners are acceptable, but always verify compatibility with your faucet model to avoid damage.
Buying Guide
Choosing the right components for cleaning inside a faucet involves factors like compatibility with your faucet type, ease of use, and the severity of buildup. Consider the following:
- Size and compatibility: Ensure tools (aerator removal tool, interior cleaning brush) fit your faucet model. Some tools are model-specific.
- Noise level: Electric vs manual brushes; manual tools may reduce noise and risk of damage.
- Energy efficiency: Not directly impacted by cleaning tools, but a well-maintained faucet preserves efficient flow and reduces energy use in hot-water systems.
- Controls: Simple handles versus advanced cartridges; be prepared to follow cartridge-specific steps.
- Placement: Under-sink space and reach; choose compact tools for tight spaces.
- Material compatibility: Avoid abrasive cleaners on delicate finishes; choose descalers safe for brass, chrome, and plastic components.
- Maintenance frequency: Hard-water areas may require more frequent cleaning; plan a maintenance schedule.
- Accessory bundle value: A kit containing aerator removal tools, interior brushes, and descalers provides best value for regular upkeep.
Using the right combination of tools, such as the faucet aerator cleaning tool kit, faucet interior cleaning brush, and faucet descaler cleaning kit, helps Americans maintain clean and efficient faucets. With careful disassembly, cleaning, and reassembly, most interior buildup can be addressed without professional help. If symptoms persist, a professional assessment ensures proper valve and cartridge replacement and leak management.